Gravel pathways make an elegant addition to outdoor spaces. Their flexibility blends effortlessly into various landscaping styles while offering practical functionality, adding character and beauty to outdoor environments.
Gravel paths also boast many other advantages that range from curb appeal enhancement to creating tranquil garden pathways. In this guide, we'll outline how you can construct your own gravel path: not only will this project look better in your garden than ever but its construction provides benefits from curb appeal enhancement to creating tranquil garden pathways! A gravel path project makes an impactful statement while being an easy and inexpensive way of adding character and beauty to landscaping projects!
Plan Your Route:
We should begin by conducting an analysis of your area. Keep an eye out for existing features like slopes or flowerbeds which might interfere with designing and laying out your pathway.
Select Path Dimensions: Decide upon size for your path that takes into account factors like foot traffic, accessibility needs, and aesthetic preference.
Consider Obstacles - To ensure an effortless pathway installation process, identify any obstacles which might impede its construction - for instance, tree roots, drainage issues, and uneven terrain can hinder construction plans and should be carefully considered as potential issues in creating your path. You should adjust your plans in order to work around any such obstructions so they do not impede progress.
Materials Required:
Gravel: When choosing your gravel type, ensure it fits both with your landscaping design as well as personal preferences in terms of color, texture, and size preferences. Calculate how much is needed by taking measurements along both length and width.
Landscape Fabric: Make sure that enough fabric covers your entire walkway area so as to provide a barrier against weeds while stabilizing gravel pathways. Invest in enough to keep weeds at bay.
Choose durable materials when creating an edge to your pathway in order to prevent gravel from disseminating across its entirety and into surrounding areas. This will also stop any unnecessary dust being kicked up during travel along its path.
Leveling Sand Uses: When soil conditions are uneven or inclined to settle, leveling sand may provide a stable base underneath fabric fabrics for support and stability.
Shovel: Shovels can be useful tools in moving, digging, and excavating soil during the preparation phase of construction projects.
Rake are essential tool for leveling and spreading both landscape fabric and gravel evenly throughout a garden bed.
Wheelbarrow: Wheelbarrows can provide an efficient means of moving heavy materials like gravel and mulch around, such as the perfect way to transport material for landscaping purposes.
A tamper can help compact gravel to form a stable and firm surface, helping ensure its stability and firmness.
Use measuring tape to accurately take and mark measurements for your path dimensions, which will ensure proper alignment and spacing of paths and walkways.
Prepare the Site:
Mark Path Outline with Spray Paint or String
Remove debris and vegetation: Gather up rocks, trees, or any objects that might obstruct installation or the stability of your pathway and dispose of them as soon as possible.
Grading Soil: For proper drainage and to create an even surface on which your path can be constructed, use either a shovel or rake to grade your soil and ensure proper grading. Smooth out any bumps or uneven areas to provide a strong base for landscape fabric or gravel applications. Stay with Natural stone carpet
Install Edging Fabric and Landscape Fabric:
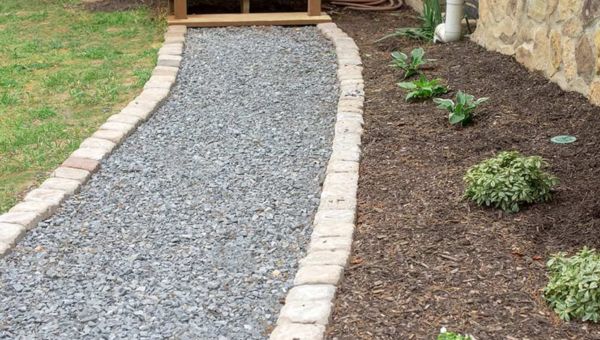
Edge Installation: Installing an edge around a pathway to contain any scattered gravel can help maintain its appearance and integrity over time. Edging also protects its inhabitants by keeping debris off-path from collecting too quickly in one area compared to another area nearby, maintaining appearances while upholding the integrity of the path over time.
Once the path area has been graded and cleared, spread landscape fabric out evenly on it to cover every inch. Make sure it extends past the edge of the path for adequate coverage; use landscape staples or pins to secure and prevent the fabric from shifting while installing gravel.
Spreading Gravel Calculate The Amount Of Gravel Required: In order to accurately ascertain how much gravel you require for spreading gravel on pathways or lawns, measure their width, length, depth desired as well as total square footage required (multiplied by depth desired in feet) before multiplying that figure times the required square footage amount in feet if purchasing in cubic yards instead.
Gravel Spread Accurately: When it comes time to spread out the gravel you require, take special care in spreading it evenly over your fabric landscape within its defined pathway area. Use either a wheelbarrow or shovel and evenly disperse with each application to achieve uniform coverage.
Focus on Achieve an Ideal Depth: Strive for an optimal depth when adding gravel pathways - between 2-3 inches is sufficient for aesthetics, stability, and comfort without becoming excessively deep or uncomfortable for use on footpaths. This ensures a pleasant walking surface.
Compact Gravel and Level It:
Once the gravel has been spread out, use either a hand compactor or tamper to compact it firmly. Start at one end of your pathway, applying constant pressure across its entirety before returning back towards its source.
Guarantee Stability. Compacting gravel is crucial in creating a long-lasting pathway surface and is necessary to reducing any chance of unlevel settling or displacement.
Use a Rake to Smooth the Surface:
After the gravel has been compacted with a shovel, use the rake for levelling out any raised areas or low spots on its surface. Use long even strokes when using this tool so as not to disrupt its integrity or create uneven patches of terrain.
Check for Consistency: Periodically step back and inspect your pathway surface to make sure it remains level with no visible bumps or depressions, adding or disbursing gravel as necessary to make adjustments as necessary.
Recompact Gravel If Needed: If the surface of your gravel appears uneven or loose, repeating the compacting process may help bring it together to meet with your expectations.
Add Final Details Finish Off Your Project Add additional gravel layers as necessary until your desired coverage and thickness have been reached, paying particular attention to areas that might appear thinned out or uneven, adding extra gravel as necessary in order to achieve an even surface.
Enhance Aesthetics - To add aesthetics, try including decorative elements like border plants or garden ornaments on the path, such as border flowers. Doing this will add character and beauty while complementing its overall design.
Cleaning Excess Stone: Sweeping away extra gravel will create neat edges while stopping loose particles from becoming tracked indoors or resulting in dust storms on adjoining surfaces.
Maintain Your Vehicle:
Regular Raking - To keep your gravel path looking its best and remaining undisturbed, regular raking should ensure the gravel remains evenly spread out over its surface and leveled off, helping prevent unevenness in settlement or depressions on its path. This also serves to avoid unevenness from settling unevenly over time if any uneven settlement occurs and any depressions occurring as a result of uneven distribution or placement of rocks on it.
Attractively remove weeds by regularly inspecting your pathway for signs of growth. Apply an herbicide or manually pull any visible weeds off as soon as they appear to stop their spread and root formation in gravel pathways.
Add New Gravel. Gravel can become compacted or lost due to natural erosion, foot traffic, or weathering over time, so add fresh gravel as required in order to replace lost material and maintain the desired thickness.
Conclusion:
For a low DIY investment and maximum outdoor enjoyment, creating and installing a gravel path is an easy DIY project to improve any outdoor area. By following the instructions in this guide you will plan, design, and construct one to complement your landscaping design - don't wait any longer; don't delay starting this rewarding adventure and you will soon enjoy both its aesthetics and functionality in no time at all